In this article, we will walk you through procedures used to convert PowerPoint presentations to videos.
Why Turn PowerPoint Into Video?
Microsoft PowerPoint is easily the most popular and widely used presentation app. It provides many themes, layout options, and tools that allow users to build and design presentations quickly. The PowerPoint app also functions as the viewer program for presentations.
If you are looking to export PowerPoint to video, there’s a decent chance you have decided that the video format (mostly likely mp4) is a better option for what you have in mind. Nevertheless, we intend to go over the two major reasons people choose to save PowerPoint as video:
- Increased accessibility: Not everyone has PowerPoint installed on their computers or smartphones. But everyone has a video player on their device—video players are built into all devices or installed by default. So, people are guaranteed the means to open your presentation quickly when you give them video files.
By converting your PPT to video (or PPTX to video), you get to show your presentation to a wider audience. Similarly, you get to share your presentation with more people faster through video files.
- Bigger audience: Videos are likely to provide the biggest audience for information delivered in presentations. The data from most surveys and statistics suggest that people watch and consume video more than other forms of content. Moreover, a considerable percentage of people are more receptive to learning through videos.
After you record your PowerPoint as a video, you get to upload it on online sharing platforms with large audiences. Or you can send your video directly to the people you want to watch it.
How to Convert PowerPoint to Video
Method 1: Use a FREE PowerPoint to Online Converter
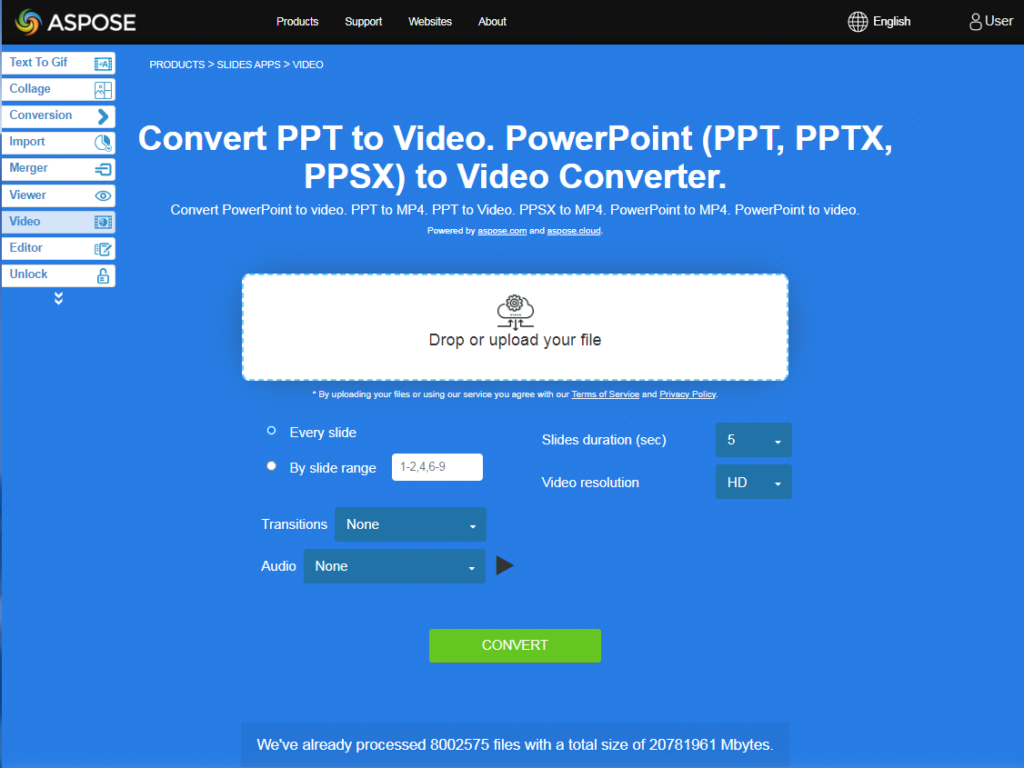
Aspose provides a free online PowerPoint to video converter. The conversion procedure involving this converter is the easiest and fastest means of converting a PowerPoint PPTX or PPT file to an MP4 video.
You can use Aspose converter anywhere—Windows, Mac, Linux, iPhone (iOS), or Android.
To convert your PowerPoint to video, go through these steps:
- Go to the converter page at https://products.aspose.app/slides/video/
- Click Drop or upload or files.
- Select the PowerPoint file you intend to convert to video on your computer.
- Wait for your file to get uploaded.
- Select an option that determines the slides that show in the video:
- Every slide is the default selection. Leave it on this option if you want slides to appear individually—one at a time, one after the other—in the video.
- By slide range means the specific range of slides. Select this option if you want only specific slides to appear in the video. For example, if your presentation contains 10 slides and you want only slides 2 to slide 6 to appear in the video, then you have to type in 2-6
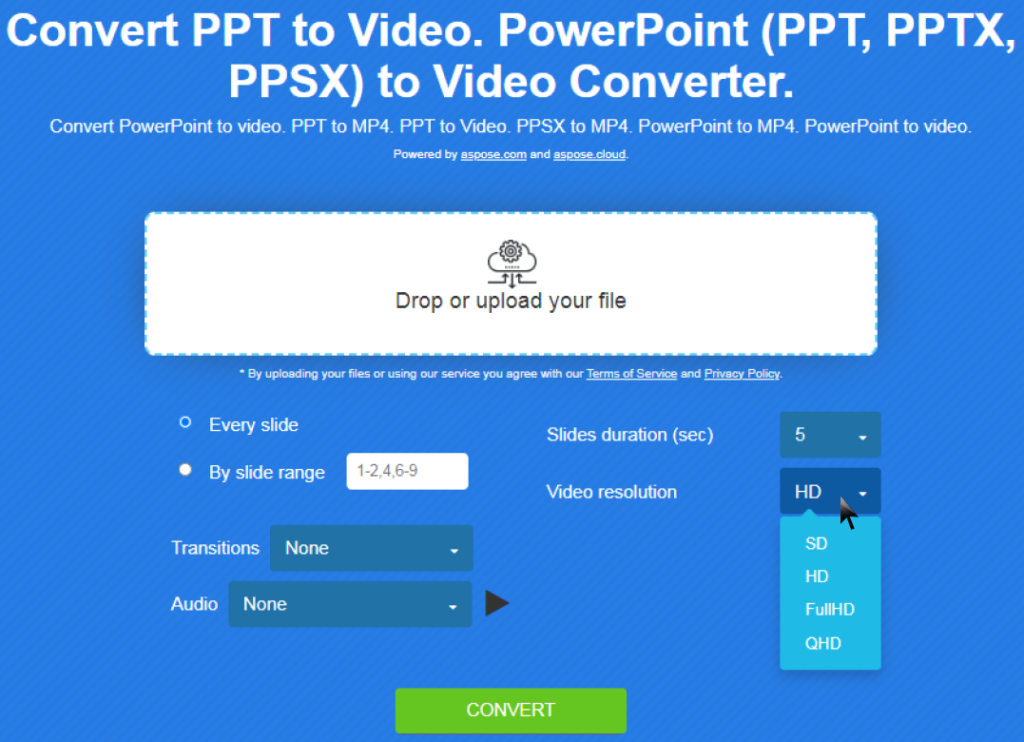
- Set the Video Resolution. You have the whole range of options: SD, HD, Full HD, QHD.
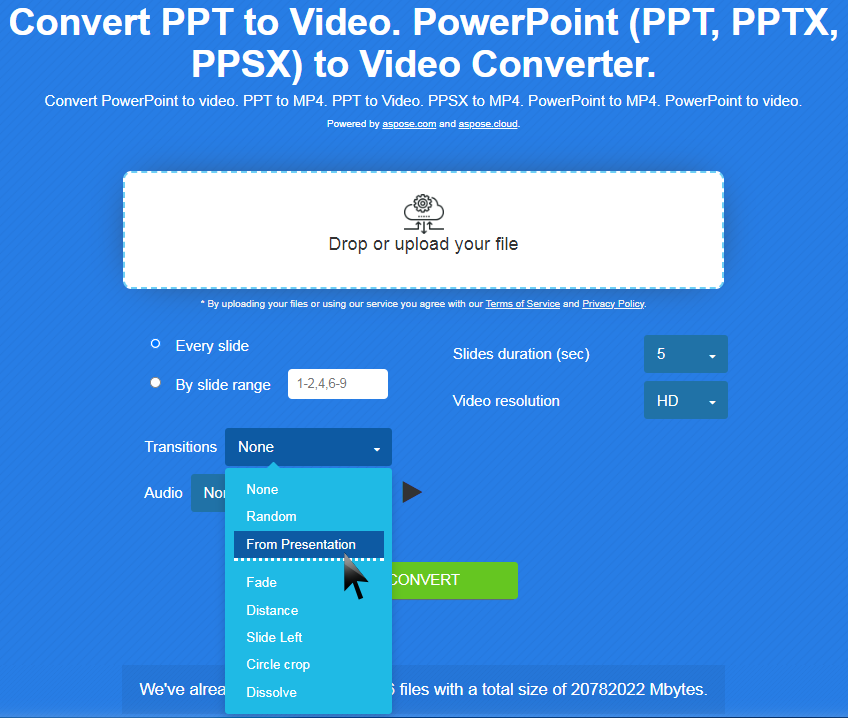
- Specify the duration for transitions. This duration determines how long a specific slide is shown in the video before the next slide appears.
- 3 means each slide is displayed for 3 seconds in the video.
- 5 means each slide is displayed for 5 seconds in the video. This duration is the default selection.
- 10 means each slide is displayed for 10 seconds in the video.
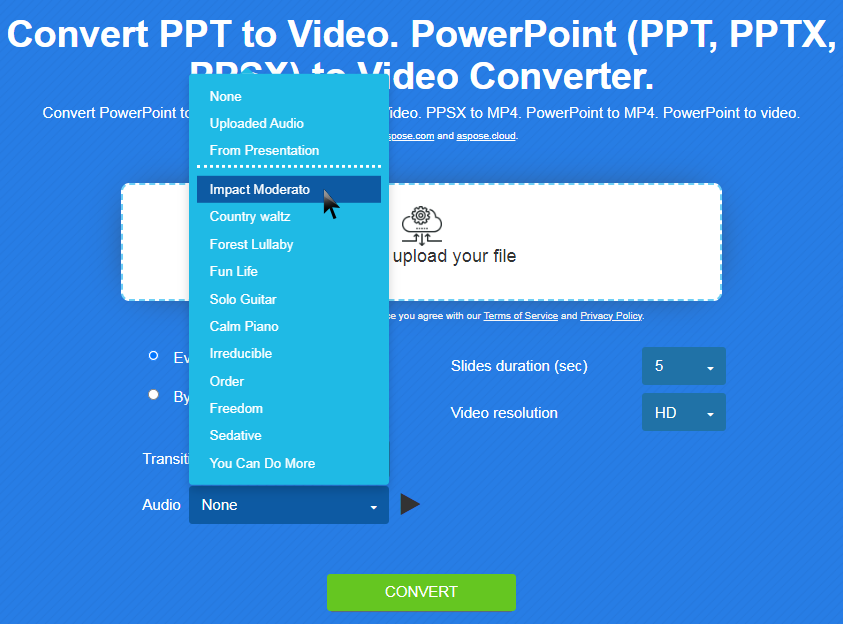
- As the next step, you can set Audio parameters.
- None (default), if no audio is required.
- Random, if it does not matter which of the preloaded audio files to be added.
- From Presentation to use audio files inserted in your PPT, PPTX or PPSX.
- Sample file name to add specific audio file to your PowerPoint presentation.
- You should note that in all cases audio is played for the entire video except for the case when you have separate audio file for each slide.
- Click the CONVERT button.
- Wait for Aspose Converter to convert your presentation to a video.
- Click DOWNLOAD NOW.
Well, you have just created a video from PowerPoint.
Note: please keep in mind that if your presentation contains any PowerPoint animation, it will not be played.
Method 2: Convert the Presentation to Video in the PowerPoint App
Here, you will learn how to convert PowerPoint to video using the PowerPoint program on a computer.
Converting PowerPoint to Video on a Windows Device
If you have PowerPoint 2016 or 2019 installed on your PC (Windows), go through these steps:
- First, you have to open the PowerPoint you want to convert in the PowerPoint application.
- Go through File > Export > Create a Video.
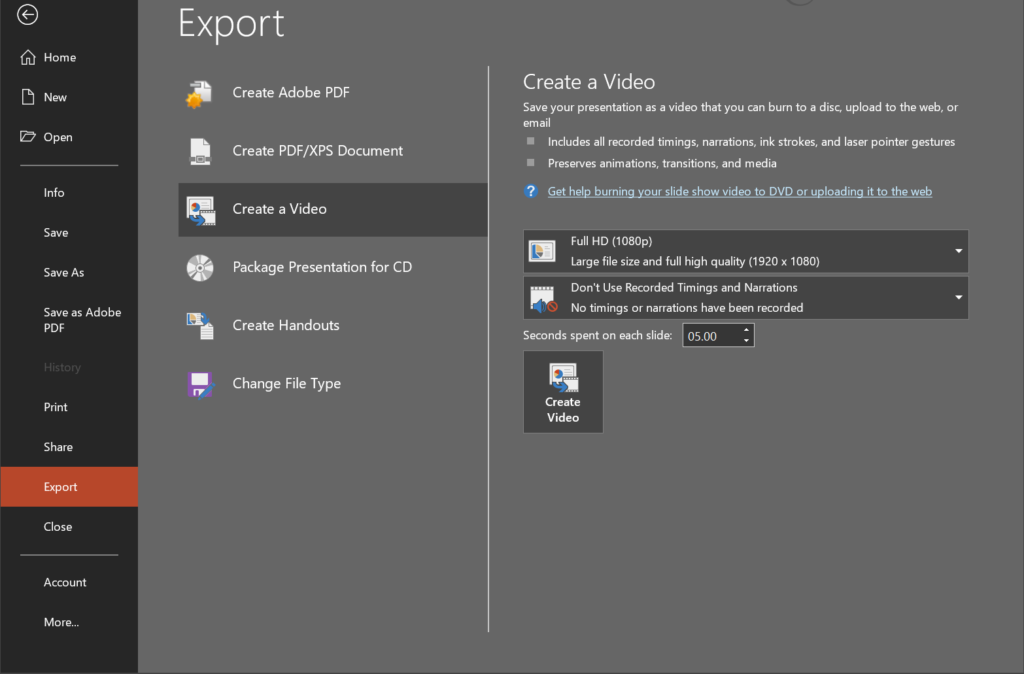
Now, you have to specify several options that determine how the PPTX/PPT to video conversion process goes and its results.
- Set the video quality.
How to select the correct video quality when converting PowerPoint to video in Windows
You have to select a setting that delivers the best outcomes in terms of file size and video quality. Essentially, the higher the quality you select, the larger the finished video file will be.
If you don’t mind dealing with or sharing a large video file with people, then you can select the highest quality available. If you plan to send the video to someone via email, then you will do well to select the option for a small file size.
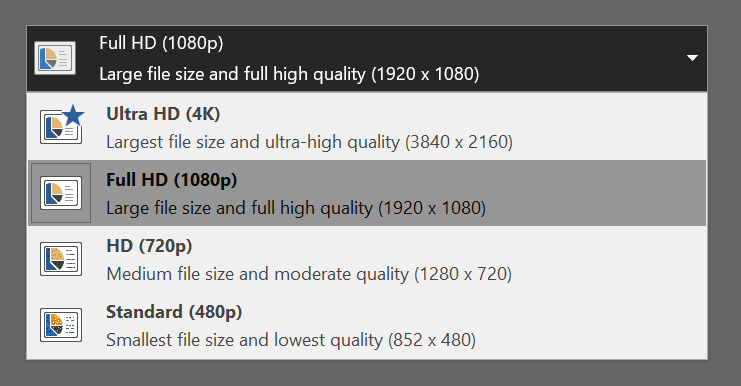
- Ultra HD (4K): Select this option if you know exactly what you are doing.
- Full HD (1080p) or Presentation Quality: Select this option if you want a high-quality video. PowerPoint will output a video that is very close to the quality of elements in the original presentation in a large life.
- HD (720p) or Internet Quality: Select this option if you want a compromise between file size and quality, especially you plan to upload the video quickly.
- Standard (480p) or Low quality: Select this option if you want the smallest video size quality available—and this means you do not mind the quality of the video.
- Specify the timing options.
How to select the correct timing when converting PowerPoint to video in Windows
Timings are the runtime for each slide in a video. They determine how long a slide is shown before the next slide appears. PowerPoint typically offers two options for timing:
- Don’t Use Recorded Timings and Narration: Select this option if you want to specify a fixed runtime for each slide. You will then have to set a figure for the Seconds spent on each slide box. For example, you can set a length of time like 5 seconds.
- Use Recorded Timings and Narrations: Select this option if you want to configure specific lengths of time for individual slides and also (optionally) record narrations for the video.
- Finally, create the PowerPoint video—click Create.
- On the Save As window, select your preferred location for the video file and type in your preferred name for the PowerPoint. We also recommend you set the Save as type to MPEG-4 Video.
The Windows Media Video (WMV) is the other video format available, but it is not as popular as MPEG-4 (mp4).
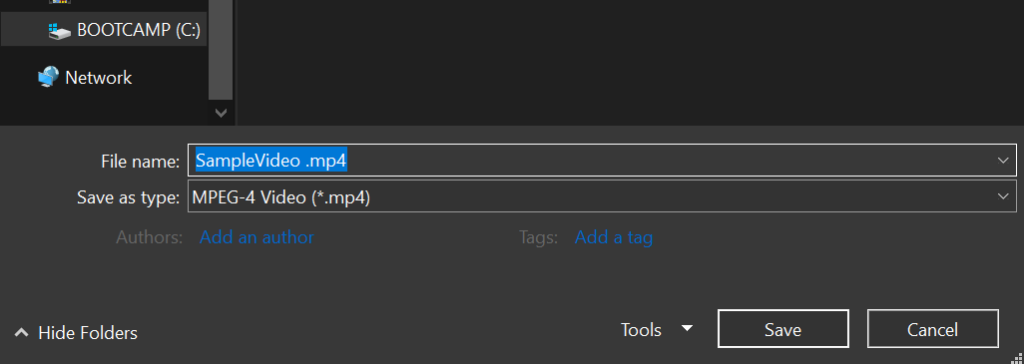
- Click the Save button.
PowerPoint now starts converting your PowerPoint presentation to a video.
Converting PowerPoint to Video on a Mac
If you have PowerPoint 2016 or 2019 installed on your Mac (macOS), go through these steps:
- First, you have to open the presentation you want to turn into a video in the PowerPoint app.
- Click File and then click Export.
- On the menu that appears, click the File Format drop-down menu and select MP4.
- Select your preferred video quality from these options:
How to select the correct video quality when converting PowerPoint to video in macOS
- Presentation Quality: Choose this option if you want a high-quality video. PowerPoint will export a video quite close to the quality of elements in the original presentation in a large life.
- Internet Quality: Choose this option if you are looking for a compromise between file size and quality, especially you plan to upload the video quickly.
- Low quality: Choose this option if you want the smallest video size quality available—and this means you do not mind the quality of the video.
- Specify the timing options.
How to select the correct timing when converting PowerPoint to video in macOS
- Don’t Use Recorded Timings and Narration: Choose this option if you want to set a fixed runtime for each slide. You will then have to set a figure for the Seconds spent on each slide box. For example, you can set a length of time like 5 seconds.
- Use Recorded Timings and Narrations: Choose this option if you want to set up specific lengths of time for individual slides and also (optionally) record narrations for slides in the video.
- Click the OK button.
- Type in your preferred name for the video file and specify the location in which you want PowerPoint to save the file.
- Click Save or Export (depending on what you see).
The PPTX/PPT to video conversion process should begin now. You will end up with an mp4 video file.
TIP
If you are looking to convert PowerPoint presentations to videos in your applications or projects, you will need Aspose.Slides.
Posted inAspose.Slides App Product Family


